How to Control AI Usage in Your Organization (Without Breaking Productivity)
A Practical MITM Proxy + Identity Enforcement Approach
The Problem: AI Is Bypassing Your Security Controls
Your users are already using AI, you just don’t control it yet.
Tools like ChatGPT, Microsoft Copilot, Claude, and other AI platforms are rapidly being adopted across organizations. In many cases, this usage is happening without visibility, without policy enforcement, and without alignment to corporate security or compliance requirements.
Employees are using AI to draft emails, summarize documents, troubleshoot technical issues, and process internal data. While these tools can significantly improve productivity, they also introduce real risks when accessed through personal accounts or unmanaged platforms.
Blocking AI entirely is rarely practical. At the same time, allowing unrestricted access creates exposure that most organizations are not prepared to manage.
The challenge is not whether AI should be used; it is how to enable it in a controlled, secure, and auditable way.
In this guide, we’ll walk through a practical approach to controlling AI usage using identity enforcement, proxy-based controls, and policy-driven access allowing your organization to safely enable AI without sacrificing visibility or control.
From a cybersecurity and compliance perspective, this creates several immediate risks:
- ❌ Users accessing AI tools with personal accounts
- ❌ Sensitive data leakage into uncontrolled AI platforms
- ❌ Lack of auditability and visibility
- ❌ No enforcement of corporate identity or policy
- ❌ Shadow IT usage outside approved tools
- Traditional controls like DNS filtering or firewall rules fall short because:
- AI platforms are embedded in legitimate web traffic
- Authentication happens at the application layer
- Blocking outright harms productivity
The Solution: Control Access Without Blocking It
At DBT, we built a practical solution that:
- ✅ Forces corporate identity usage
- ✅ Blocks anonymous and personal account access
- ✅ Redirects users to approved enterprise AI services
- ✅ Maintains user productivity
- ✅ Works without requiring Intune
Note: This guide is intended as a general reference for implementing controlled AI access in an enterprise environment. Configuration details may vary based on your infrastructure, and this approach should be adapted to meet your organization’s specific security, compliance, and operational requirements.
Click Here to Read the Architectural Overview and High-Level Details
Architecture Overview
At a high level, this is what the flow looks like:
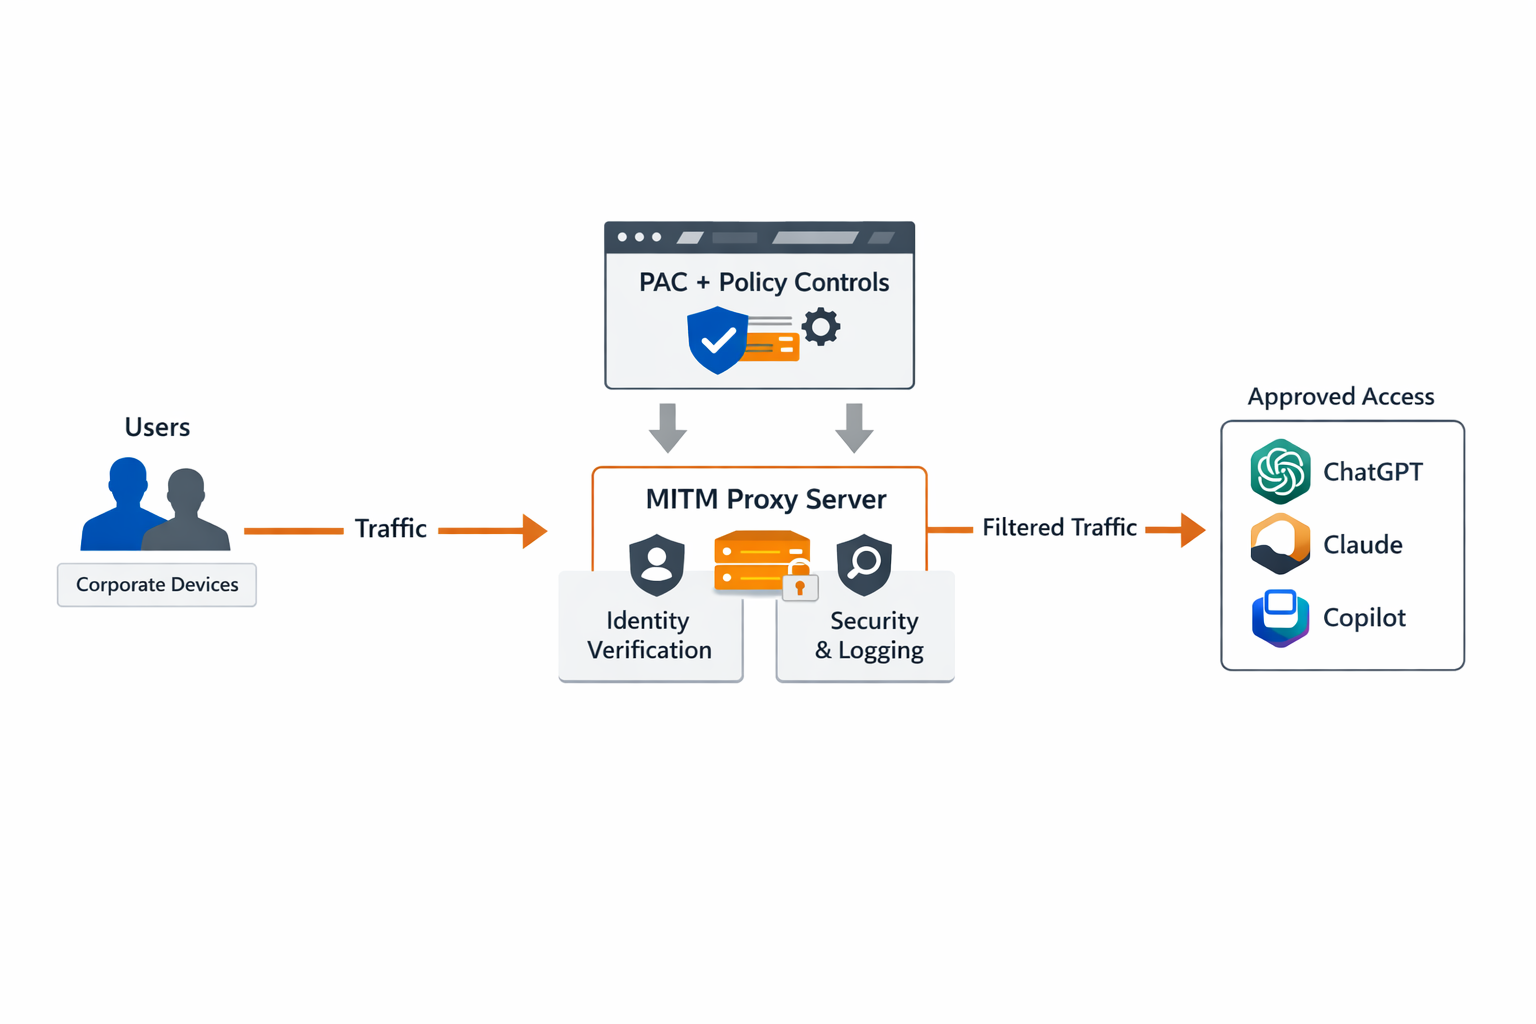
Figure: Example architecture for controlling AI access using PAC routing, proxy enforcement, and identity-based policies.
This solution combines:
| Layer | Purpose |
|---|---|
| GPO (Chrome/Edge) | Enforce corporate browser identity |
| PAC File | Route AI traffic through proxy |
| MITM Proxy | Inspect and control traffic |
| Python Logic | Enforce AI platform policies |
How It Works (High-Level Flow)
- 🌐 User browses to an AI platform
- 🧭 PAC file routes traffic to proxy
- 🔐 Proxy intercepts HTTPS traffic
- ⚙️ Python logic:
- Injects identity headers
- Blocks or redirects unauthorized usage
- 📊 User is:
- Allowed (corporate account)
- Blocked (anonymous)
- Redirected (to approved platform)
Key Technologies Used
- mitmproxy — traffic interception and manipulation
- Non-Sucking Service Manager — run proxy as Windows service
- IIS — host PAC file
- Group Policy — enforce browser and proxy configuration
Click Here to Read the Step-by-Step Deployment Guide
Step 1: Install MITM Proxy
-
Download mitmproxy from the official website:
https://mitmproxy.org - Download the Windows installer package and extract or install the application.
-
Create the application directory on the target system:
mkdir C:\mitmproxy -
Copy the mitmproxy binaries into the application directory:
C:\mitmproxy\ -
Confirm that the required executables are present:
mitmproxy.exe
mitmdump.exe -
Open Command Prompt and verify mitmdump executes correctly:
Navigate toC:\mitmproxy\→ Run:
mitmdump.exe --version - Confirm the version output is displayed without errors. This verifies that the installation is functioning properly.
-
Important: All subsequent steps in this guide assume mitmproxy is installed in:
C:\mitmproxy\
Step 2: Generate and Deploy Certificate
-
Create the certificate directory:
mkdir C:\mitmproxy\certs -
Run mitmdump to generate the Certificate Authority (CA) directly in the target directory:
Open Command Prompt as Administrator → Navigate toC:\mitmproxy\→ Run:
mitmdump.exe --set confdir=C:\mitmproxy\certs -
Allow mitmdump to fully start, then stop it with
Ctrl + C.
This generates all required CA files inC:\mitmproxy\certs\. -
Locate the generated certificate files:
C:\mitmproxy\certs\ -
Use the following certificate file for Group Policy deployment:
C:\mitmproxy\certs\mitmproxy-ca-cert.cer -
Deploy the certificate via Group Policy:
Computer Configuration → Windows Settings → Security Settings → Public Key Policies → Trusted Root Certification Authorities -
After deployment, confirm the certificate is trusted on endpoints:
Runcertlm.msc→ Trusted Root Certification Authorities → Certificates -
Important: Ensure mitmdump is always started with:
--set confdir=C:\mitmproxy\certs
so it consistently uses the same Certificate Authority.
Step 3: Create AIProxy.py
-
Create the Python script file:
C:\mitmproxy\AIProxy.py - Copy and paste the following script into the file:
from mitmproxy import http, ctx
from urllib.parse import urlparse, parse_qsl, urlencode, urlunparse

# ----------------------------
# OpenAI / ChatGPT
# ----------------------------
OPENAI_HEADER_NAME = "ChatGPT-Allowed-Workspace-Id"
OPENAI_HEADER_VALUE = "<YOUR_WORKSPACE_ID>"

OPENAI_HOSTS = (
    "chatgpt.com",
    ".chatgpt.com",
    ".openai.com",
    ".auth.openai.com",
    ".oaistatic.com",
    ".oaiusercontent.com",
)

# ----------------------------
# Anthropic / Claude
# ----------------------------
CLAUDE_HEADER_NAME = "anthropic-allowed-org-ids"
CLAUDE_HEADER_VALUE = "<YOUR_ORG_ID>"

CLAUDE_HOSTS = (
    "claude.ai",
    ".claude.ai",
    "api.anthropic.com",
    ".anthropic.com",
)

# ----------------------------
# Microsoft Tenant Restrictions
# ----------------------------
MS_TENANT_HEADER_NAME = "Restrict-Access-To-Tenants"
MS_TENANT_HEADER_VALUE = "<YOUR_TENANT_DOMAIN>"

MS_MSA_HEADER_NAME = "sec-Restrict-Tenant-Access-Policy"
MS_MSA_HEADER_VALUE = "restrict-msa"

# ----------------------------
# Copilot Controls
# ----------------------------
MS_COPILOT_PERSONAL_HOSTS = (
    "copilot.microsoft.com",
    ".copilot.microsoft.com",
    "copilot.com",
    ".copilot.com",
    "copilot.ai",
    ".copilot.ai",
)

BLOCK_PERSONAL_COPILOT = True

def host_in_scope(host: str, scopes: tuple[str, ...]) -> bool:
    host = (host or "").lower()
    for item in scopes:
        if item.startswith("."):
            if host.endswith(item):
                return True
        else:
            if host == item:
                return True
    return False


class AIWorkspaceControl:
    def request(self, flow: http.HTTPFlow) -> None:
        host = (flow.request.pretty_host or "").lower()
        path = flow.request.path or "/"

        # Microsoft Tenant Restriction
        if host in ("login.microsoftonline.com", "login.microsoft.com", "login.windows.net"):
            flow.request.headers[MS_TENANT_HEADER_NAME] = MS_TENANT_HEADER_VALUE
            return

        if host == "login.live.com":
            flow.request.headers[MS_MSA_HEADER_NAME] = MS_MSA_HEADER_VALUE
            return

        # Block / Redirect Personal Copilot
        if host_in_scope(host, MS_COPILOT_PERSONAL_HOSTS):
            if BLOCK_PERSONAL_COPILOT:
                flow.response = http.Response.make(
                    302,
                    b"",
                    {"Location": "https://copilot.cloud.microsoft"}
                )
                return

        # OpenAI Handling
        if host_in_scope(host, OPENAI_HOSTS):
            flow.request.headers[OPENAI_HEADER_NAME] = OPENAI_HEADER_VALUE
            return

        # Claude Handling
        if host_in_scope(host, CLAUDE_HOSTS):
            flow.request.headers[CLAUDE_HEADER_NAME] = CLAUDE_HEADER_VALUE
            return


addons = [AIWorkspaceControl()]-
Update the following values before use:
<YOUR_WORKSPACE_ID>
<YOUR_ORG_ID>
<YOUR_TENANT_DOMAIN> -
Validate the script manually before installing the service:
Open Command Prompt → Navigate toC:\mitmproxy\→ Run:
mitmdump.exe -s C:\mitmproxy\AIProxy.py --listen-port 8080 --set confdir=C:\mitmproxy\certs - Confirm that mitmdump starts without errors and begins listening on port 8080.
Step 4: Install NSSM (Service Wrapper)
-
Download NSSM:
https://nssm.cc/download -
Install the Windows service:
Open Command Prompt as Administrator → Run:
nssm install "MITM Proxy" -
In the NSSM service configuration window, set the application path to:
C:\mitmproxy\mitmdump.exe -
Set the startup directory to:
C:\mitmproxy\ -
Set the arguments to:
-s C:\mitmproxy\AIProxy.py --listen-port 8080 --set confdir=C:\mitmproxy\certs\ -
Configure the service to run as:
Local System -
Start the service and verify it is running:
Openservices.msc→ LocateMITM Proxy→ Confirm status isRunning -
Confirm mitmdump is using the relocated CA files in
C:\mitmproxy\certs\and that HTTPS inspection succeeds without certificate warnings on managed endpoints.
Step 5: Create and Host PAC File
-
Replace the following values in the PAC file:
<PROXY_SERVER_FQDN>
<PROXY_PORT>(example: 8080)
function FindProxyForURL(url, host) {
    host = host.toLowerCase();

    // ----------------------------
    // OpenAI / ChatGPT
    // ----------------------------
    if (host === "chatgpt.com" ||
        dnsDomainIs(host, ".chatgpt.com") ||
        host === "chat.openai.com" ||
        dnsDomainIs(host, ".openai.com") ||
        dnsDomainIs(host, ".auth.openai.com") ||
        dnsDomainIs(host, ".oaistatic.com") ||
        dnsDomainIs(host, ".oaiusercontent.com")) {
        return "PROXY <PROXY_SERVER_FQDN>:<PROXY_PORT>";
    }

    // ----------------------------
    // Anthropic / Claude
    // ----------------------------
    if (host === "claude.ai" ||
        dnsDomainIs(host, ".claude.ai") ||
        host === "api.anthropic.com" ||
        dnsDomainIs(host, ".anthropic.com")) {
        return "PROXY <PROXY_SERVER_FQDN>:<PROXY_PORT>";
    }

    // ----------------------------
    // Google Gemini / Bard
    // ----------------------------
    if (host === "gemini.google.com" ||
        dnsDomainIs(host, ".gemini.google.com") ||
        host === "bard.google.com" ||
        dnsDomainIs(host, ".bard.google.com")) {
        return "PROXY <PROXY_SERVER_FQDN>:<PROXY_PORT>";
    }

    // ----------------------------
    // Google Search (AI Mode Control)
    // ----------------------------
    if (host === "www.google.com" || host === "google.com") {
        return "PROXY <PROXY_SERVER_FQDN>:<PROXY_PORT>";
    }

    // ----------------------------
    // Microsoft Authentication (Tenant Restriction Enforcement)
    // ----------------------------
    if (host === "login.microsoftonline.com" ||
        host === "login.microsoft.com" ||
        host === "login.windows.net" ||
        host === "login.live.com") {
        return "PROXY <PROXY_SERVER_FQDN>:<PROXY_PORT>";
    }

    // ----------------------------
    // Microsoft Copilot (Personal / Consumer)
    // ----------------------------
    if (host === "copilot.microsoft.com" ||
        dnsDomainIs(host, ".copilot.microsoft.com") ||
        host === "copilot.com" ||
        dnsDomainIs(host, ".copilot.com") ||
        host === "copilot.ai" ||
        dnsDomainIs(host, ".copilot.ai")) {
        return "PROXY <PROXY_SERVER_FQDN>:<PROXY_PORT>";
    }

    // ----------------------------
    // Bing Copilot Paths
    // ----------------------------
    if (host === "bing.com" || host === "www.bing.com") {
        if (shExpMatch(url, "*://bing.com/chat*") ||
            shExpMatch(url, "*://www.bing.com/chat*") ||
            shExpMatch(url, "*://bing.com/copilotsearch*") ||
            shExpMatch(url, "*://www.bing.com/copilotsearch*")) {
            return "PROXY <PROXY_SERVER_FQDN>:<PROXY_PORT>";
        }
    }

    // Default: Direct Access
    return "DIRECT";
}-
This PAC file ensures that:
- All AI platform traffic is inspected by the MITM proxy
- Microsoft authentication flows are intercepted for tenant restriction enforcement
- Personal Copilot usage is redirected or blocked via proxy logic
- Any traffic not matching these rules will bypass the proxy and connect directly.
Step 6: Deploy Proxy via GPO
- Open the Group Policy Management Console on a domain-joined administrative workstation or domain controller.
- Create a new Group Policy Object (GPO) or edit an existing one that applies to the target users or devices.
-
To ensure proxy settings apply consistently, enable the following policy:
User Configuration → Administrative Templates → Windows Components → Internet Explorer → Make proxy settings per-machine -
Configure the PAC file deployment using Group Policy Preferences:
User Configuration → Preferences → Control Panel Settings → Internet Settings -
Create or edit an Internet Settings item and enable:
Use automatic configuration script -
Set the automatic configuration script URL to:
http://<PAC_SERVER_FQDN>/proxy.pac - Apply the GPO to the appropriate Organizational Units (OUs) containing the target users or workstations.
-
Force Group Policy to update on a test workstation:
gpupdate /force -
Confirm the PAC file is being used on the client:
Open Internet Options → Connections → LAN Settings
Verify Use automatic configuration script is enabled and points to the correct PAC URL. -
Validate PAC file accessibility from the workstation:
Open a browser and navigate to:
http://<PAC_SERVER_FQDN>/proxy.pac -
The PAC file should display as plain text. If it does not load, verify IIS bindings, DNS resolution, firewall access, and the MIME type for
.pac.
Step 7: Enforce Browser Identity (Critical)
- To reduce bypass opportunities, enforce browser sign-in restrictions for both Google Chrome and Microsoft Edge using Group Policy.
-
Import the latest administrative templates (ADMX/ADML) for:
Google Chrome Enterprise
Microsoft Edge -
Copy the ADMX and ADML files into the Central Store, if one is being used:
\\<DOMAIN>\SYSVOL\<DOMAIN>\Policies\PolicyDefinitions -
Configure the following Google Chrome policies:
Computer Configuration → Administrative Templates → Google → Google Chrome -
Set Chrome policy values as follows:
RestrictSigninToPattern = .*@<YOUR_DOMAIN>\.com
BrowserSignin = 2
IncognitoModeAvailability = 1
BrowserAddPersonEnabled = 0 -
Configure the following Microsoft Edge policies:
Computer Configuration → Administrative Templates → Microsoft Edge -
Set Edge policy values as follows:
RestrictSigninToPattern = .*@<YOUR_DOMAIN>\.com
BrowserSignin = 2
BrowserGuestModeEnabled = 0
InPrivateModeAvailability = 1 -
These settings help ensure that:
- Users sign into browsers with approved corporate identities only
- Guest browsing is restricted
- Private browsing modes are disabled
- Additional unmanaged browser profiles cannot be created
-
After applying the GPO, force a policy refresh on a test endpoint:
gpupdate /force -
Validate policy application in each browser:
Chrome:chrome://policy
Edge:edge://policy -
Important: Replace
<YOUR_DOMAIN>with your actual approved email domain before deploying these settings.
Step 8: Block AI Platforms via Web Content Filtering (Optional)
You won’t catch every AI platform, so block everything by default and allow only what you trust.
- 🛑 Implement a default-deny approach for AI platforms using DNS filtering or a secure web gateway.
-
🎯 Block broad AI categories and known domains to reduce exposure to:
- Unapproved AI tools
- Personal account usage
- New and emerging platforms
- ✅ Create explicit allow rules for approved platforms controlled by your proxy (e.g., ChatGPT, Claude, Microsoft Copilot).
-
🧩 Use both layers where possible:
DNS Filtering + Web Content / Secure Web Gateway - 📂 Group policies into an “AI Platforms” category for easier management and future updates.
-
🔍 Review logs regularly to:
- Identify blocked AI usage attempts
- Spot new platforms
- Adjust policies as needed
- ⚠️ Important: This complements proxy controls — it does not replace identity enforcement or inspection.
What This Enables
🔐 Identity Enforcement
- No personal AI usage
- Corporate accounts only
- Approved platform access
🔍 Visibility
- Full proxy logging
- Central inspection point
- Improved auditability
🛑 Control
- Block, allow, or redirect
- Platform-specific policies
- Reduce shadow AI usage
⚙️ Flexibility
- No full MDM required
- Works with on-prem AD
- Adapts to new AI tools
🧱 Layered Security
- Browser + PAC + Proxy + Filtering
- Defense-in-depth approach
- Consistent enforcement
⚠️ Fail Awareness
- Understand proxy bypass risk
- Plan for monitoring & alerts
- Maintain control integrity
Why This Matters
AI adoption is already happening inside most organizations — often without visibility or control. Employees are using tools like ChatGPT, Copilot, Claude, and other platforms to work faster and more efficiently, but frequently outside of approved processes or corporate oversight.
This creates a gap between productivity and governance. Sensitive data may be submitted to unmanaged platforms, personal accounts may be used in place of corporate identities, and security teams are left without clear insight into how AI is being used.
Blocking AI entirely is not a practical solution. Users will find alternatives, and the business loses the efficiency gains these tools provide. At the same time, unrestricted access introduces risk that most organizations cannot afford to ignore.
The goal is not to stop AI usage — it is to guide it. By putting the right controls in place, organizations can support productivity while maintaining visibility, enforcing identity, and reducing exposure to unmanaged or unapproved platforms.
Who This Is For
- IT Directors and IT Leadership
- Security and Compliance Teams
- Organizations using Microsoft 365 and other enterprise SaaS platforms
- Healthcare, Financial Services, Municipal, and Government environments
- Organizations that want to enable AI safely without allowing unmanaged adoption
Final Thoughts
AI is already part of your environment. The question is whether it is being used in a way that aligns with your organization’s security, compliance, and operational expectations.
Blocking AI outright often leads to workarounds and shadow usage. Allowing unrestricted access creates unnecessary risk. The most effective approach sits in the middle, enabling approved platforms while maintaining control over how they are accessed and used.
By combining identity enforcement, proxy-based routing, and layered policy controls, organizations can reduce exposure, improve visibility, and guide users toward approved AI tools without disrupting productivity.
This approach is not tied to a single platform or vendor. It is a flexible framework that can evolve alongside your environment as new AI tools continue to emerge.
If you are looking to move from unmanaged AI usage to a more controlled and deliberate model, this is a practical place to start.
Disclaimer
The information, configurations, and code samples provided in this article are for general informational and educational purposes only. While every effort has been made to ensure accuracy, this guide does not account for all possible environments, configurations, or edge cases.
Implementation of the concepts described herein should be performed by qualified IT and security professionals and adapted to your organization’s specific infrastructure, security policies, and compliance requirements.
Direct Business Technologies (DBT) makes no warranties, express or implied, regarding the completeness, reliability, or suitability of this information. By using this guide, you acknowledge that any implementation is performed at your own risk.
DBT shall not be held liable for any damages, data loss, service interruptions, security incidents, or other impacts that may result from the use or misuse of the information, scripts, or configurations provided in this article.
Want Help Implementing This?
Want Help Implementing This?
If you’re looking to securely enable AI while maintaining visibility, identity control, and policy enforcement, we can help you evaluate the right approach for your environment.
What we’ll review:
- Where AI is currently being used in your environment
- Which platforms should be allowed, restricted, or blocked
- How to safely enable approved AI services
- How to align AI usage with your security and compliance requirements